Docker is a modern, most popular development tool. Docker uses OS-level virtualization to deliver software in packages called Container. These containers are isolated from one another. This isolated environment makes Docker unique and popular.
We can create many development environments without side effects. You can share your development environment recipe with other team members so that they also can create the same environment as yours.
On the Docker Hub, we have an official WordPress docker image. But this image has PHP version limitations, it only supports above PHP7.0.
In a development or testing environment, we need more options and more flexibility. So we need to look for different tools. Fortunately, we also have one, Devilbox.
Devilbox is an incredible tool. It can create LAMP or MERN stacks inside isolated Docker containers. It is highly customizable. You can switch to any PHP, MySQL, version. You can use Redis or Memcached, NGINX or Apache, WP-CLI, composer, PHPMyAdmin, etc.

So Let’s get Started with Devilbox
Prerequisite Install Docker and Docker Compose.
Create a folder anywhere, I am on Ubuntu and I created a folder wp_dev in my home directory. Open your terminal and change the directory to wp_dev. Then clone Devilbox from GitHub and also download WordPress from WordPress org then unzip the WordPress core and rename the parent directory, I named it talash.
git clone https://github.com/cytopia/devilbox.git

wget https://wordpress.org/latest.zip
Now go to /devilbox and copy and rename `env-example` to .env then pone it on a text editor. This file has all version numbers, directory paths, etc. Devilbox gets data from this file and uses that data in a docker-compose file. Find those variables and make the below modification on the .env file.
TLD_SUFFIX:dev
#It is the domain extension of your project. For example talash.dev
#You can add any extension.

HTTPD_SERVER=apache-2.4
#By default Devilbox provided Nginx, but I will use the Apache server.
#So I uncommented the above variable, and commented nginx variable.

PHP_SERVER=8.0
# If you want to change PHP version.

MYSQL_SERVER=mysql-8.0
#Comment MariaDB variable and uncomment a MySQL version.

HOST_PATH_HTTPD_DATADIR=..
#We have stored WordPress core in the `wp_dev` folder so we will use the parent folder path here.

HTTPD_DOCROOT_DIR=.
#It will be the document sub directory.
Now we need to add DNS for our project. Open etc/hosts file on the terminal, here I’m using nano. nano etc/hosts .
Then add: 127.0.0.1 talash.dev
It will be the domain of your project. The domain name will be the same as the WP core folder name and the extension will be the same as TLD_SUFFIX.
All set now let’s run Devilbox…
Before starting Devilbox, please check if anything is running on your global :80 port, if yes, then stop that. For example:sudo service apache2 stop
Then run docker up to start running Devilbox.
docker-compose up -d php mysql httpd
If you need Memcached or Redis, then you also can start those containers by writing names with the above command. You also can install WP-CLI or composer from a docker container.
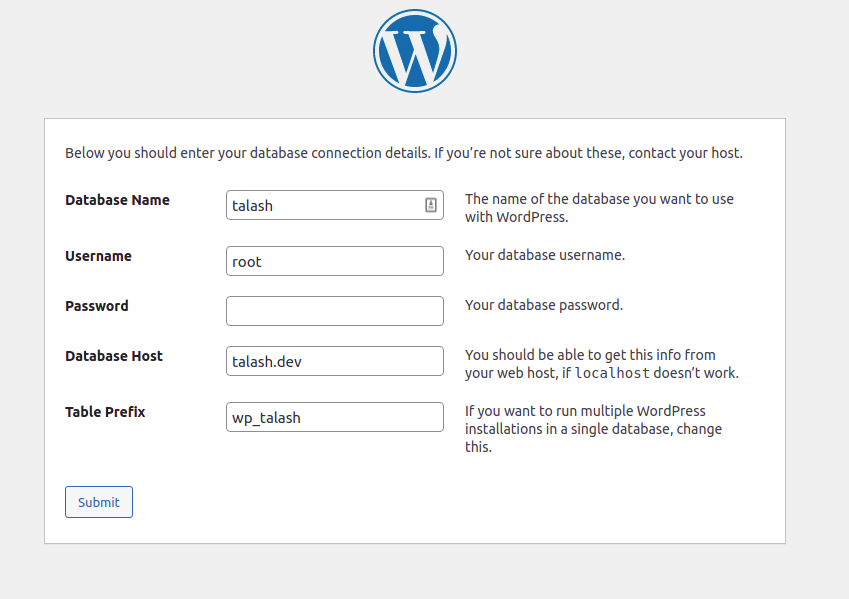
Now go to `http://localhost` on the browser, then from the top menu click on `Tools > phpMyAdmin.
Create the database called talash. Then go to http://talash.dev
Now you should see the WordPress installation window.